Install
Subscription Manager
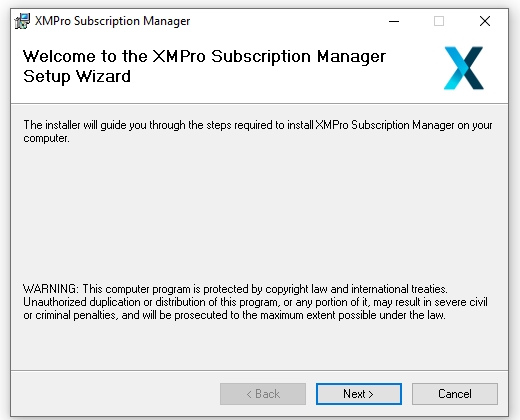
- Start the installation process by running the Subscription Manager.exe file, received from your XMPro.
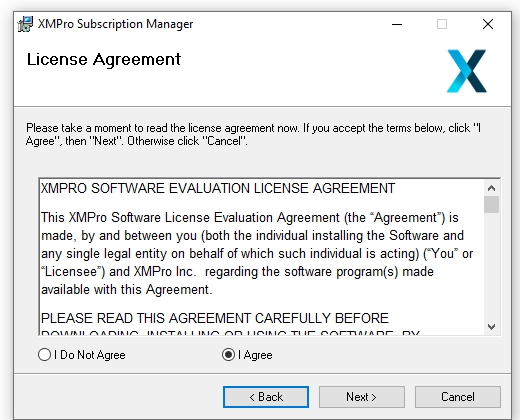
- Click the "I Agree" button and press "Next"
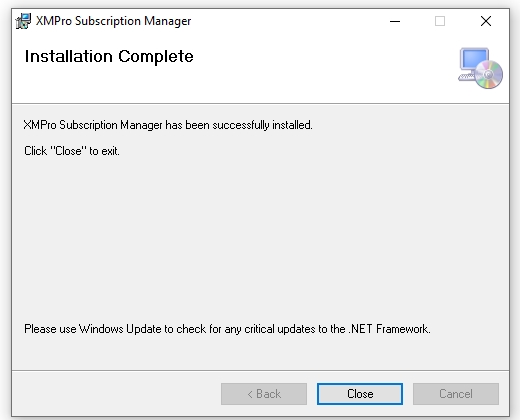
- Follow the instructions and when the installation is finished click "Close"
Note
This "Setup" will install the installer you will use to install the database and website
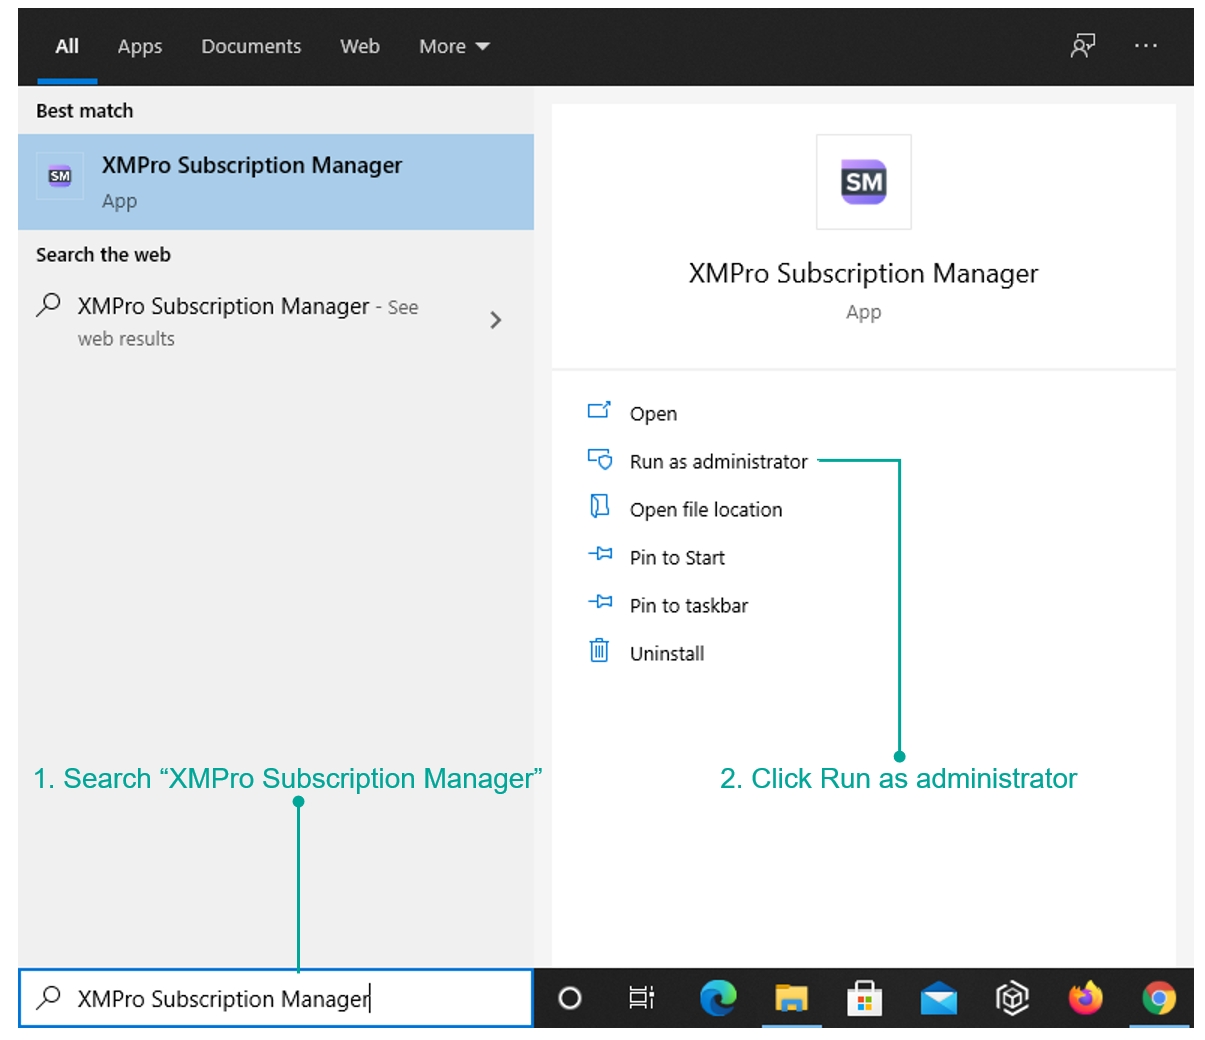
- When this initial installation is complete, open the start menu
- Search for "XMPro Subscription Manager" and click on Run as Administrator
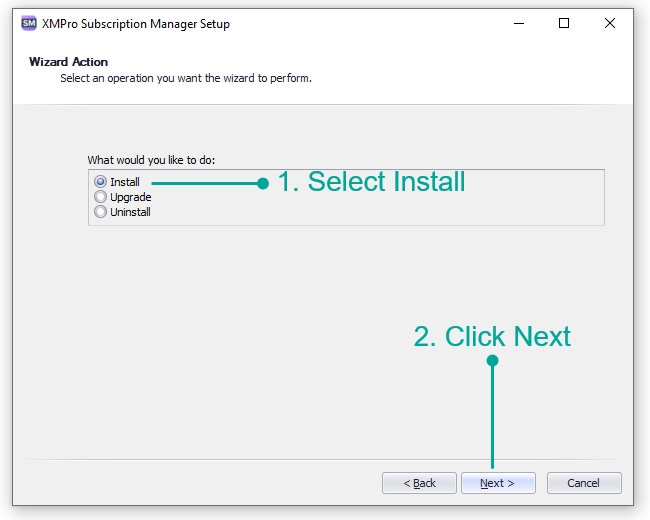
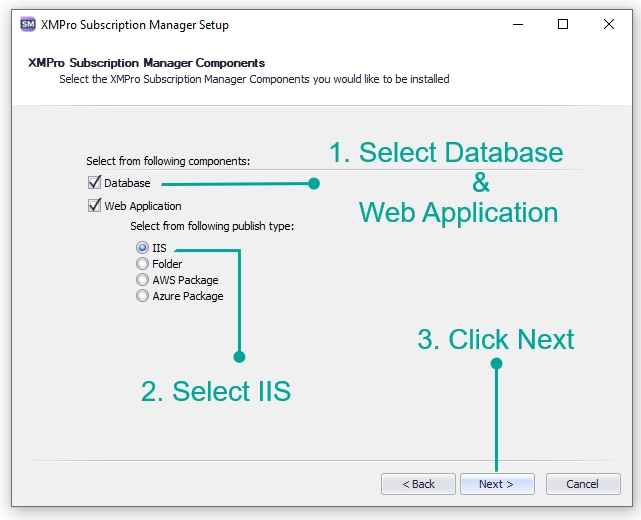
Component Choice
- When the installer launches, choose "Install" and click "Next"
- Select the components that you would like to install and click "Next"
Note
If this is the first time you are installing Subscription Manager select both "Database" and "Web Application"
Database
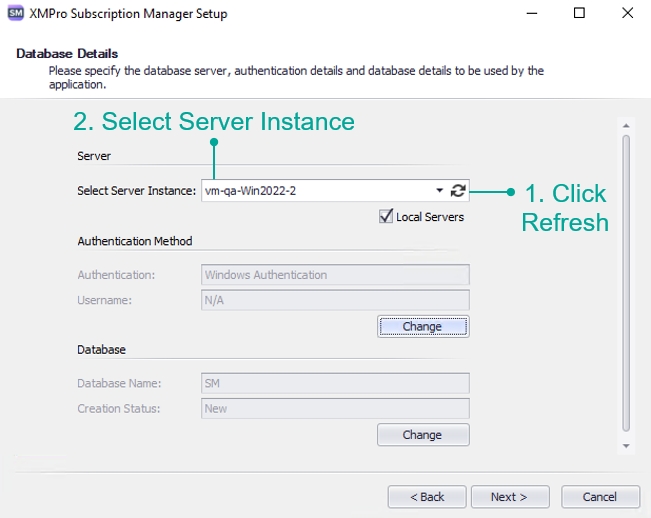
Server
- Select the server instance to which you would like to connect
Note
If you already know the server instance name, it can be entered manually. Otherwise, use the refresh button on the right to load all available servers. Selecting the "Local Servers" check box will limit the search to the local network.
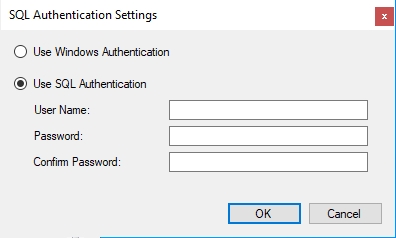
Authentication Method
- Specify the authentication method that should be used: Windows or SQL
9.1. Windows Authentication: you may leave the options as is
Warning
Configure a service account that can be used for Windows authentication.
9.2. SQL authentication:
- Click the "Change" button
- Select the "Use SQL Authentication" option
- Enter the username and password of the SQL Server instance you're connecting to
Warning
The SQL user must have permission to create databases on the server.
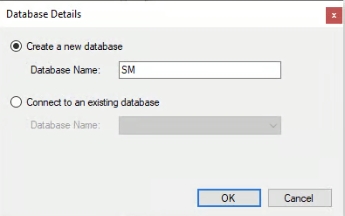
Database
Note
The Database section allows you to configure if you would like to use an existing database or create a new one. Leaving the options as default will result in a new database being created.
To change the pre-populated name of the new database or to select to use an existing database:
- Click the "Change" button
- Make the changes needed by selecting the correct option
- Specify the name of the new database or select an existing database from the drop-down
Web Application
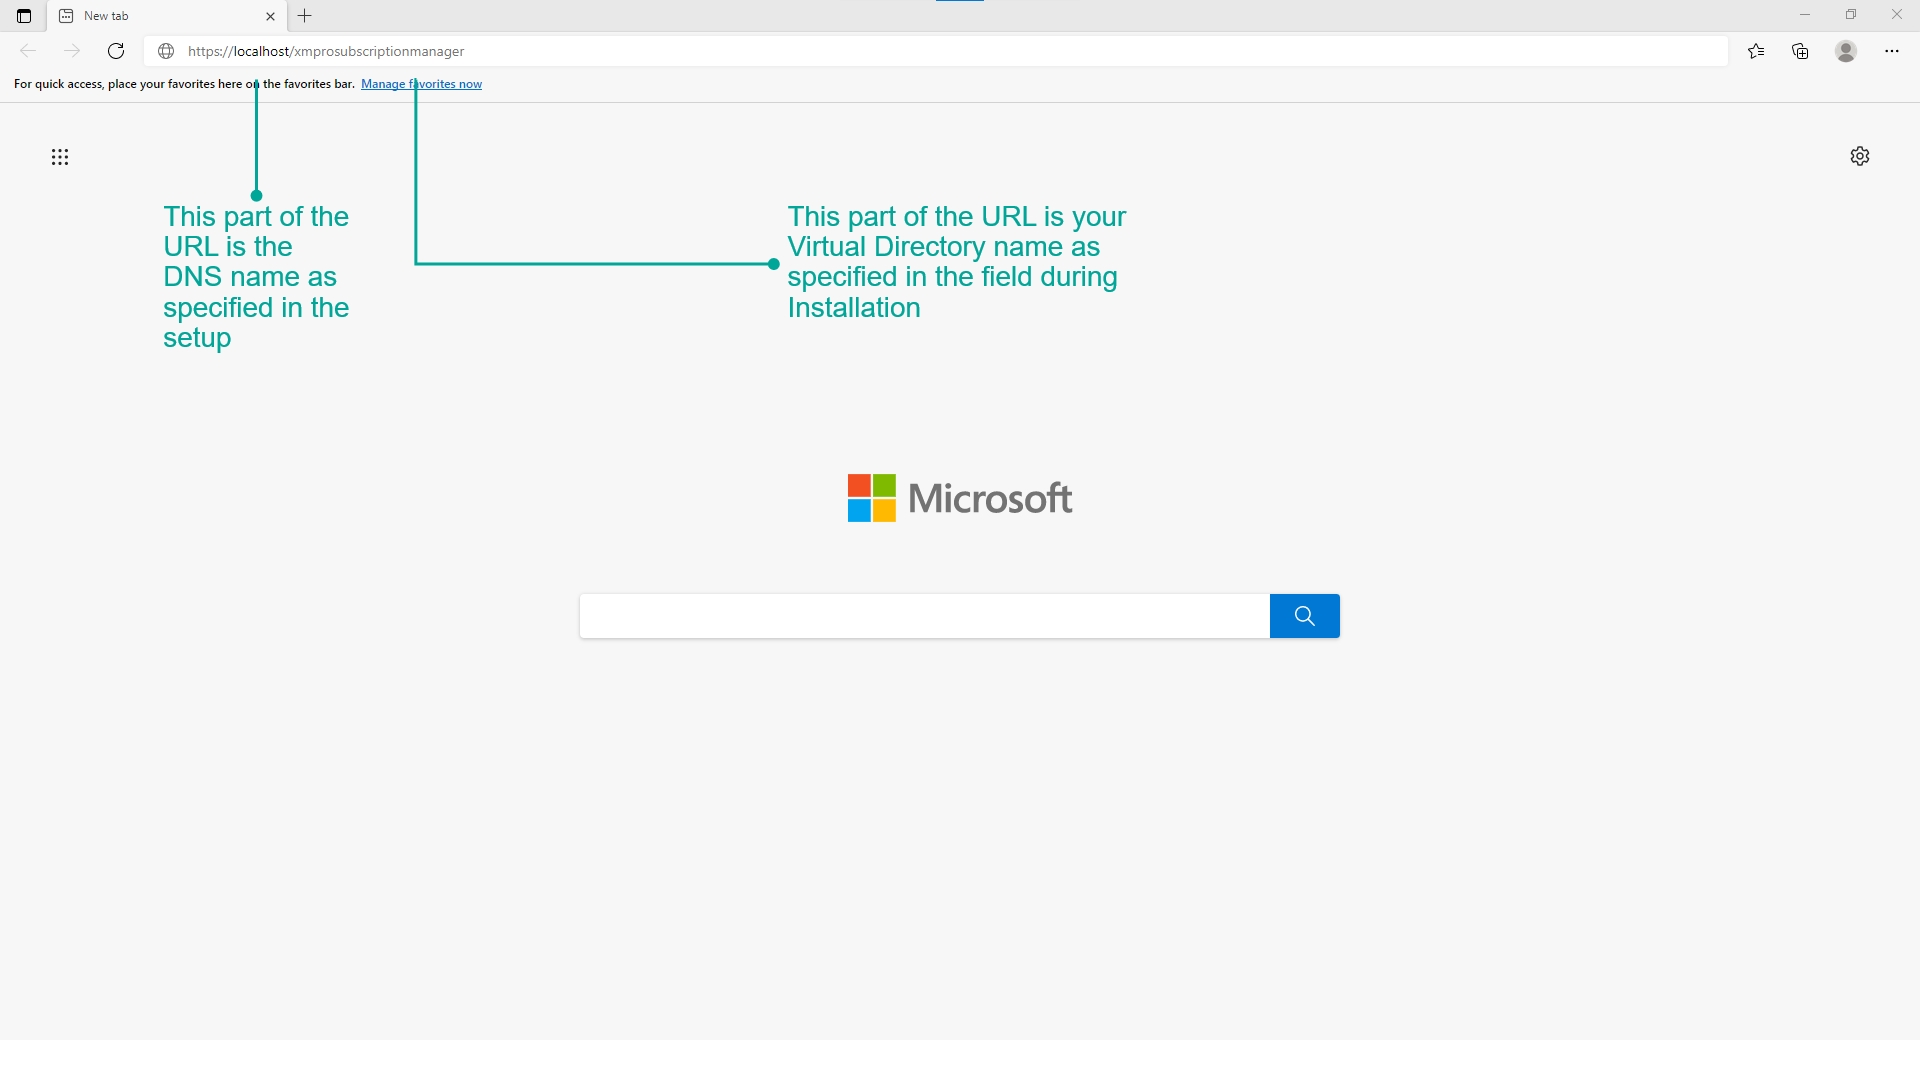
DNS Name
- Verify if your DNS name is correct, if not, edit the value to contain the correct DNS name
Note
This is your fully qualified domain name (FQDN). Please find some examples below explaining the DNS name.
- https://localhost/xmprosubscriptionmanager
- https://vm-qa-win2022-2/xmprosubscriptionmanager
- https://demo.azurewebsites.com
| Complete Address | DNS | Virtual Directory |
|---|---|---|
| https://localhost/xmprosubscriptionmanager | localhost | xmprosubscriptionmanager |
| https://vm-qa-win2022-2/xmprosubscriptionmanager | vm-qa-win2022-2 | xmprosubscriptionmanager |
| https://demo.azurewebsites.com | demo.azurewebsites.com |
Virtual Directory
- Select the parent site from the Web Site drop-down
Note
By default, the Virtual Directory name will be "xmprosubscriptionmanager" which will be created within IIS for the Subscription Manager site. If you wish to change the name you can specify it in the "Virtual Directory Name" text box.
- Verify if the value in the content directory field is correct. If not, apply any changes needed
Note
By default, the option to create a sub-directory within the content directory is checked and you can specify a name in the "Sub-Directory" text box.
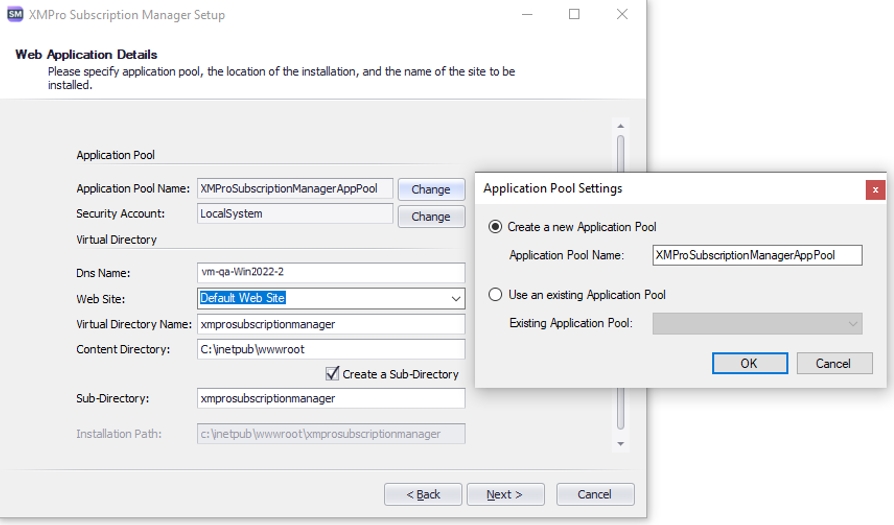
Application Pool
- If you wish to change this name or use an existing application pool, click the Change button
Note
By default, a new application pool will be created when installing the site. The new application pool will have the same name as the name specified in the "Application Pool Name" field.
- Either select the "Create a new Application Pool" or "Use an existing Application Pool" option
Note
If you choose "Create a new Application Pool", give it an appropriate name. If you choose "Use an existing Application Pool", select an existing application pool from the drop-down.
Security Account
- Select a security account that can be used
Note
The default option is "Local System", which is a built-in security account. You can either change it by selecting a different built-in security account from the drop-down or by specifying your own security account.
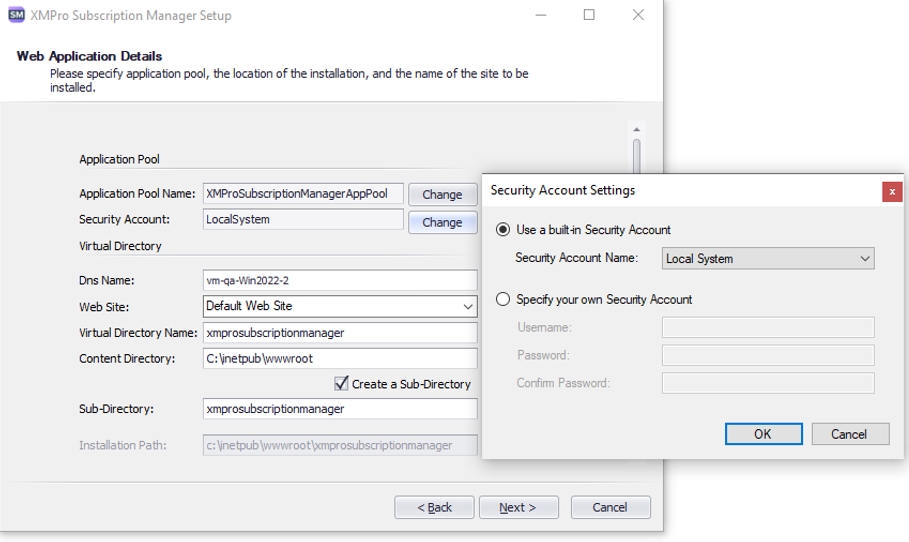
Warning
If you selected Windows authentication to connect to the database, you must choose "Specify your own Security Account" and provide the correct credentials. The service account must have batch logon rights enabled. More Information on how to set up a custom application pool in IIS as well as steps on how to enable batch logon rights can be found in this link.
SMTP
- Enter the SMTP details referenced in the 1. Preparation guide. By default, the "Enable Email Notification" is checked.
Note
SMTP can be disabled by unchecking the "Enable Email Notification" checkbox if you don't want to receive email notifications. If at a later stage email notifications are needed, the installer can be run again to add SMTP functionality.
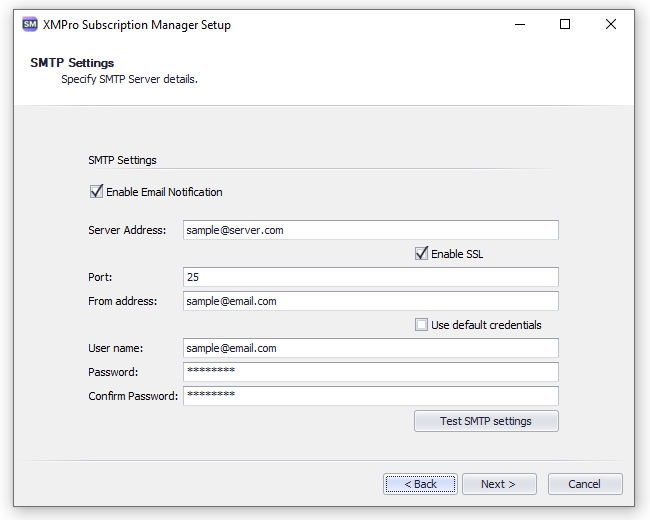
Warning
You are required to set up an SMTP account. Failing to do so will make registering new users very cumbersome.
Check your connection to the email server using the "Test SMTP settings" button.
Certificates
During the installation process, you will be asked to upload two certificates: a signing certificate and an encryption certificate. You may use the same certificate for both options. The instructions on how to create a certificate can be found in the Installing Prerequisites guide.
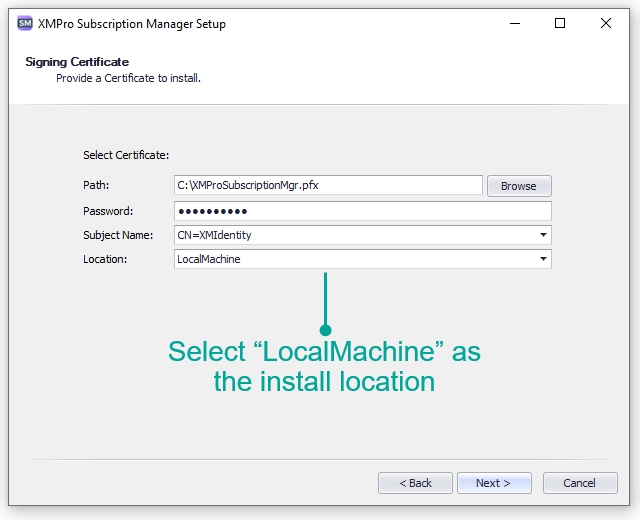
Signing Certificate
- Start by browsing to a suitable .pfx certificate file. Specify the password for the certificate
- Use the dropdown to select "Subject Name"
Note
It is recommended that you choose "LocalMachine" as the Location for the signing certificate.
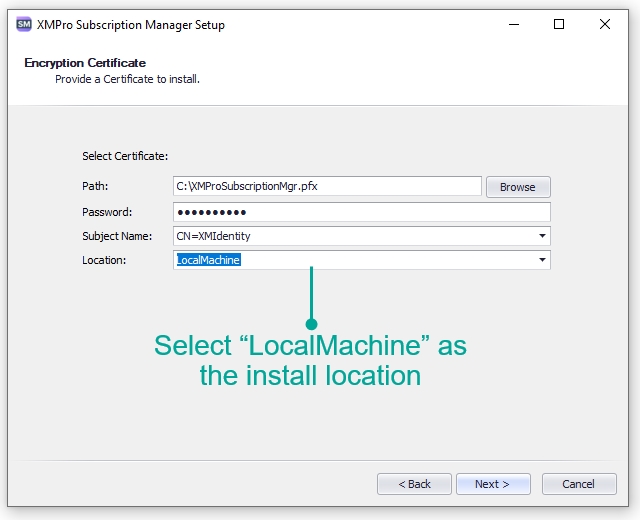
Encryption Certificate
- Start by browsing to a suitable .pfx certificate file. Specify the password for the certificate
- Use the dropdown to select "Subject Name"
Note
It is recommended that you choose "LocalMachine" as the Location for the encryption certificate.
Warning
Both certificates must contain a private key.
Final Steps
- Continue through the wizard, confirm the installation and the components will be installed

Warning
Note the username and password on the last screen of the installer. This user has been created during installation as Subscription Manager itself needs at least one user in the system. Without it, you cannot add other users.
Change the password of the default user to a new, secure password after logging in for the first time.
Accessing the Website
Using Web Browser
- Access the website by putting the URL into your browser
Note
The format of the URL will be as follows: "https://yourdnsname/virtualdirectoryname/"
Obtaining an Installation Profile
To install the Data Stream Designer and App Designer, you will need an Installation Profile.
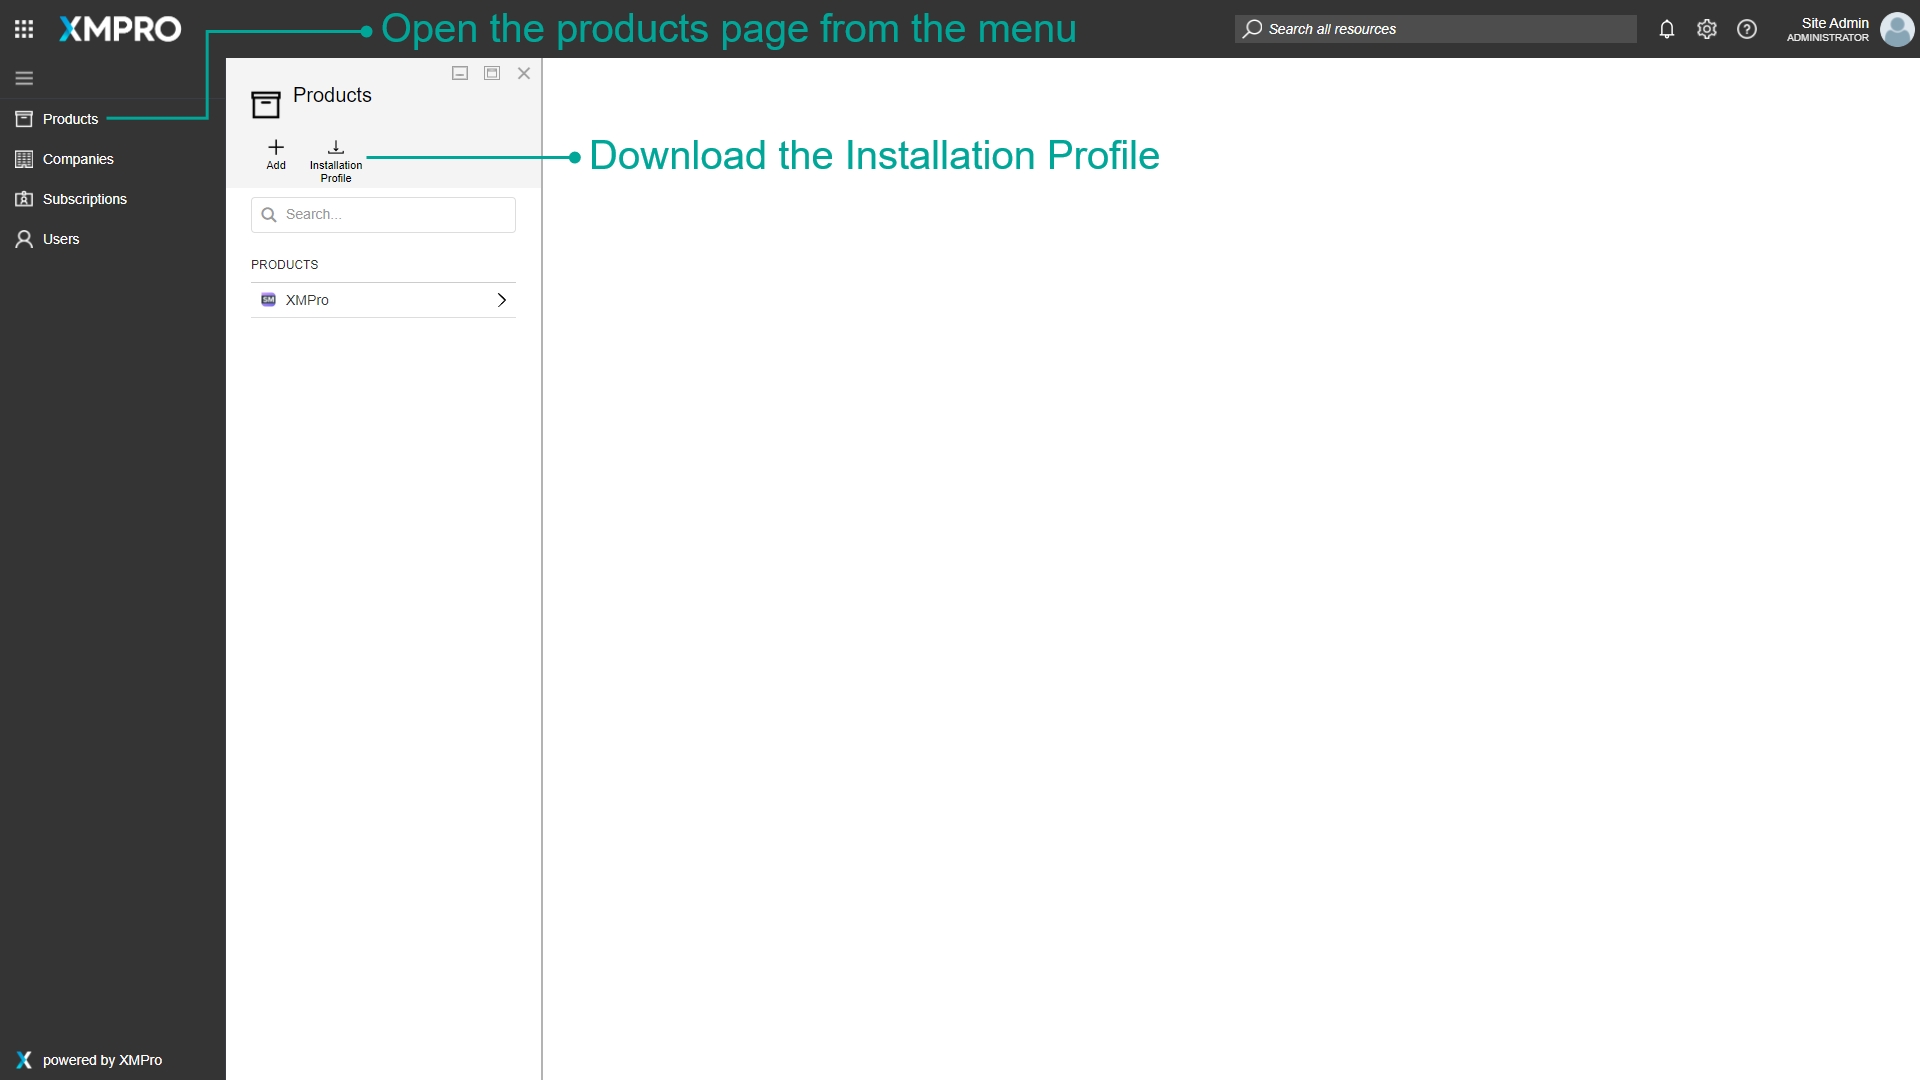
- Navigate to the XMPro Subscription Manager site as above using the Global Admin Login Details
- Go to the Subscription Manager page
- Click Products in the menu and click the Installation Profile button
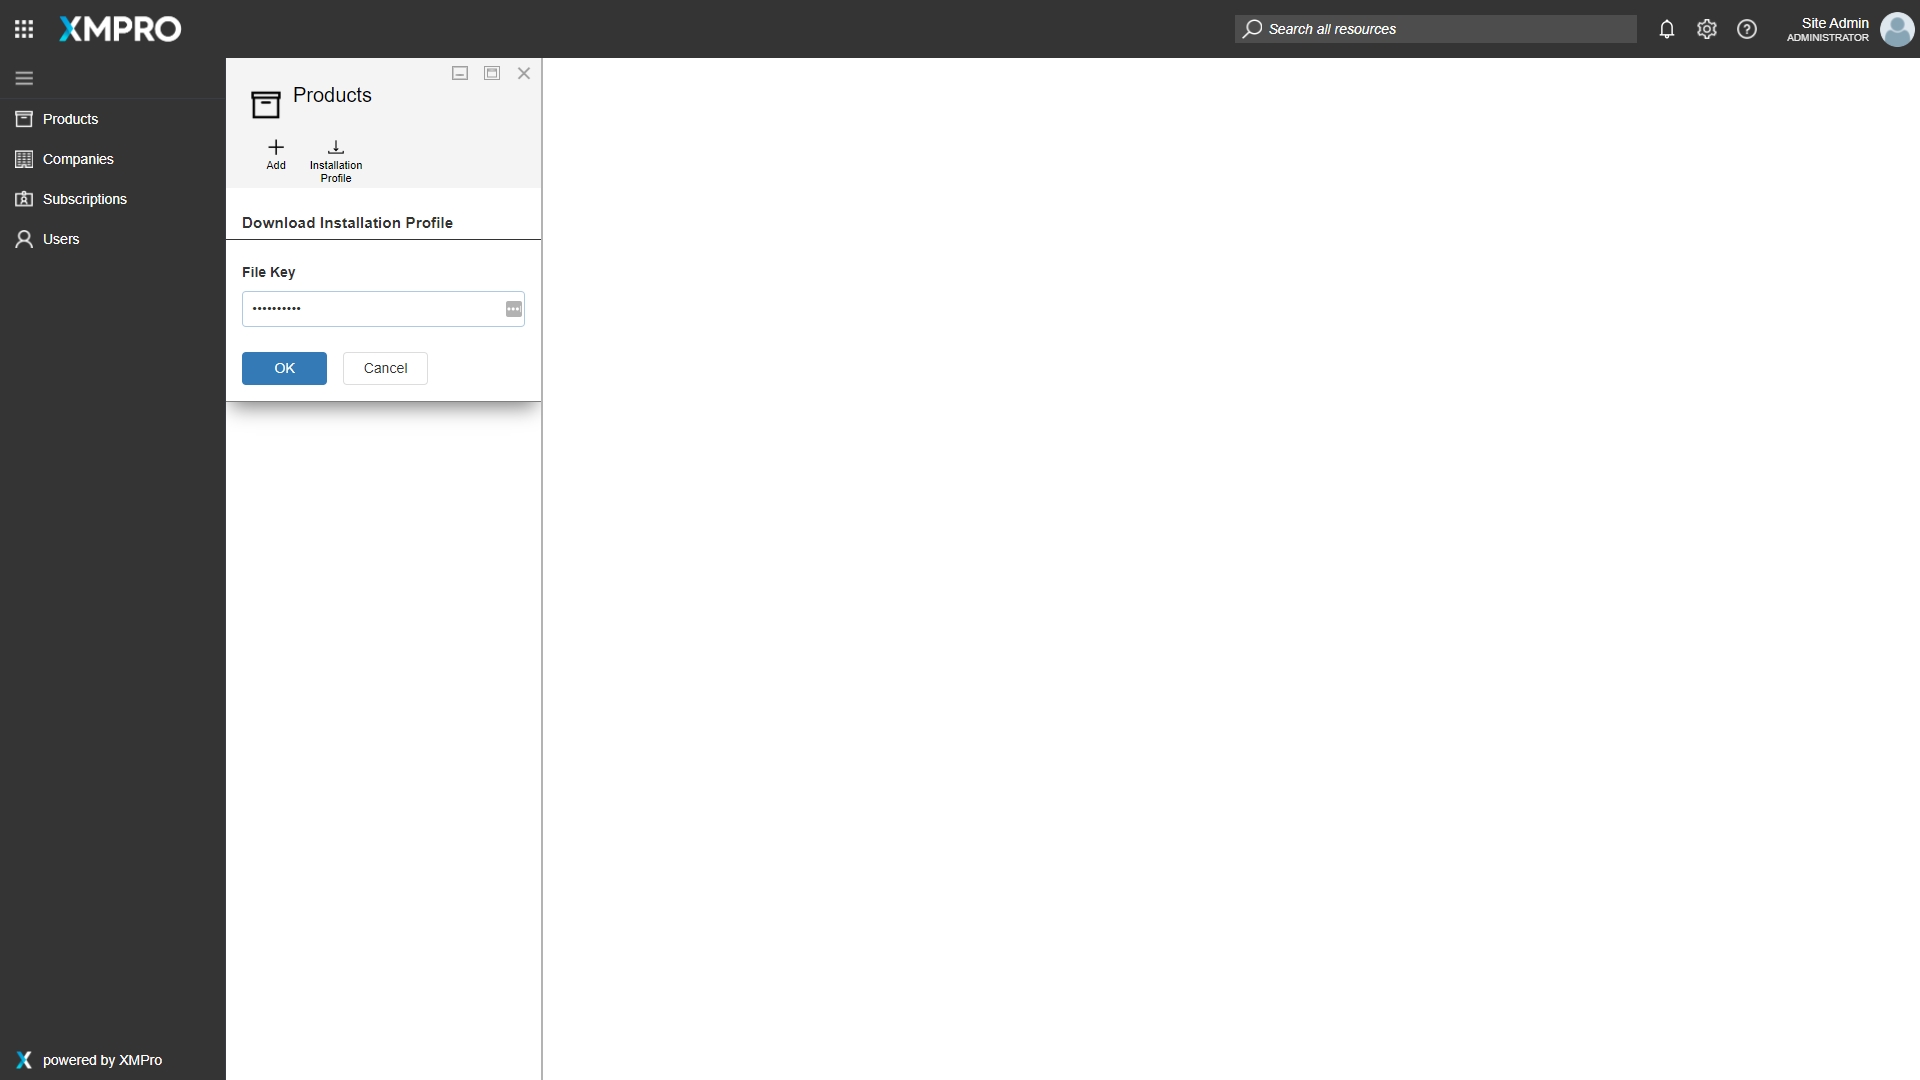
- Enter a File Key and press OK to download the file
Warning
Remember the file key as it is needed when installing Data Stream Designer and App Designer.
Optional: IIS User Permissions
If you've chosen to use a custom service account during installation, you may have to perform an extra step. An error may be shown after logging into Subscription Manager, even after giving the IIS_USRS group permission on the signing certificate private keys. The error would be as follow: "We could not grant you access to the requested subscription. There was an unexpected error". The logs would also contain the following error: "System.Security.Cryptography.CryptographicException: Keyset does not exist".
To solve this issue, use this article as a guideline to grant access for the Application Pool Identity (in some cases a domain account) on the signing certificate private keys.
Data Stream Designer
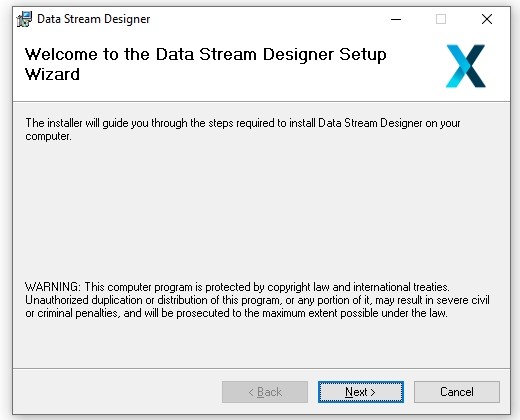
- Start the installation process by running the Data Stream Designer.exe that you've received from XMPro.
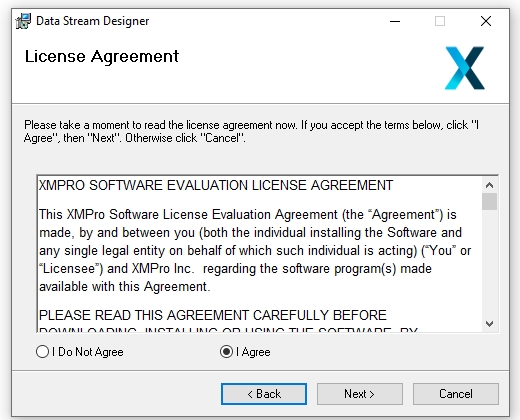
- Click the "I Agree" button and press "Next"
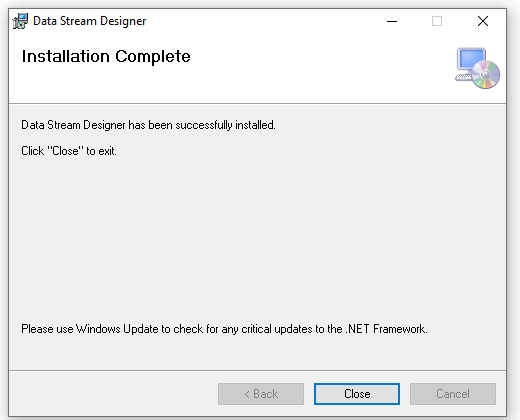
- Follow the instructions and when the installation is finished click "Close"
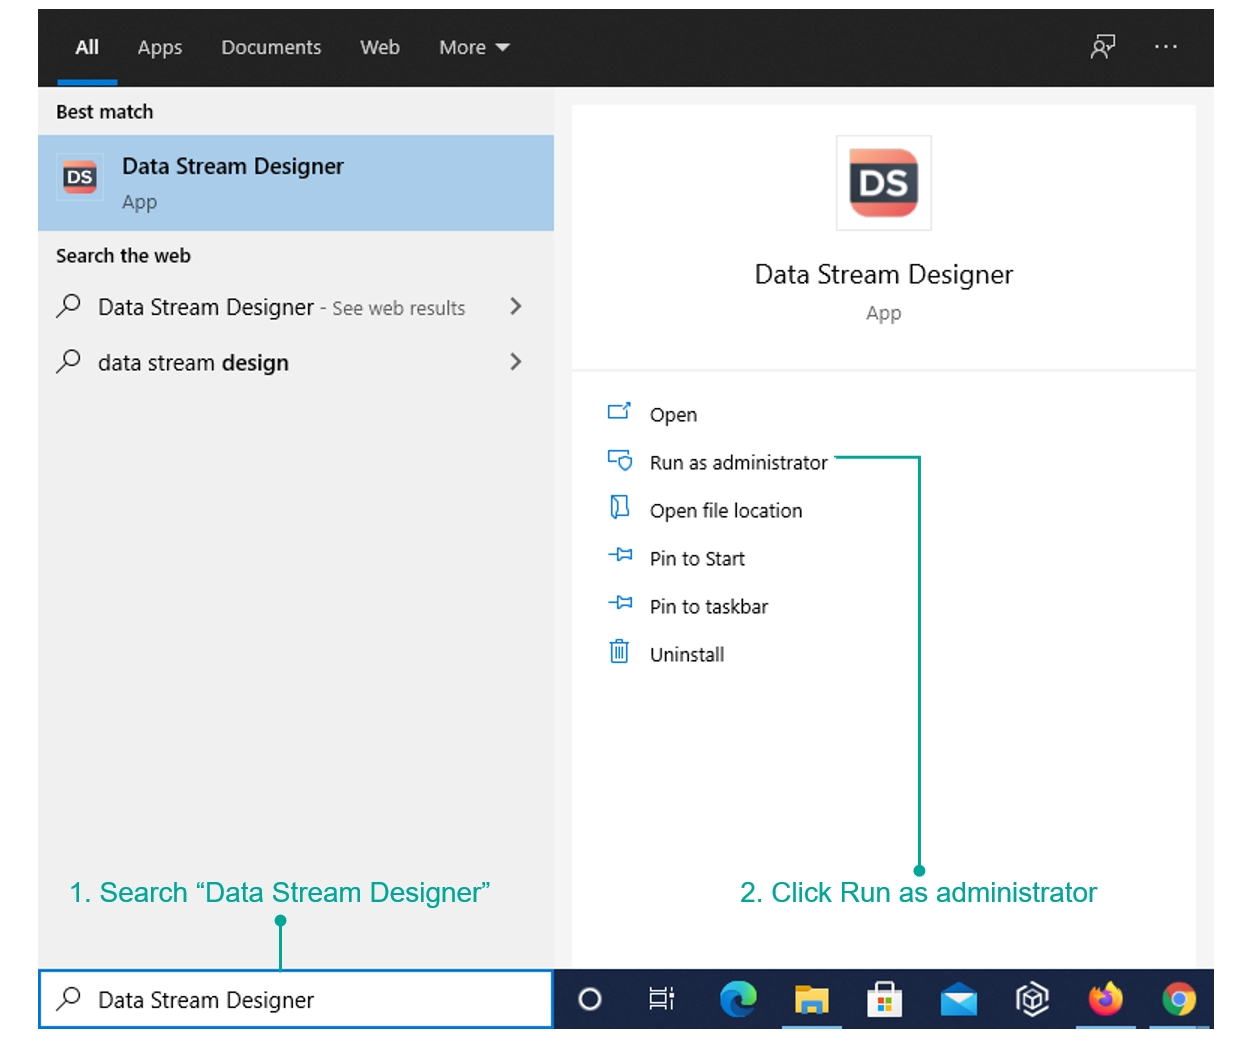
- When this initial installation is complete, open the start menu
- Search for "Data Stream Designer" and click on Run as Administrator
Component Choice
- When the installer launches, choose "Install"
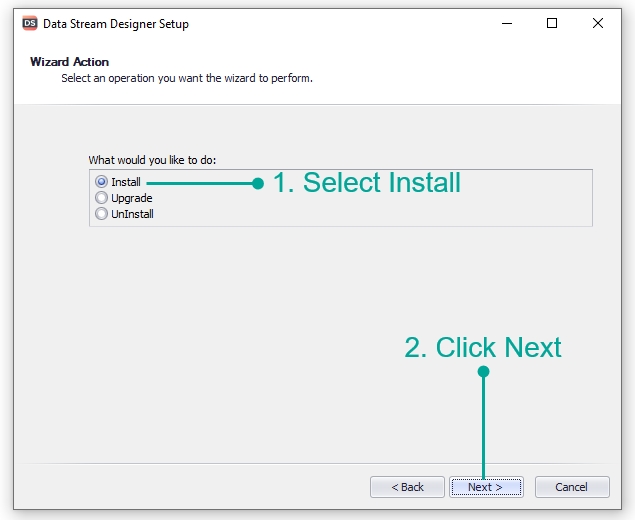
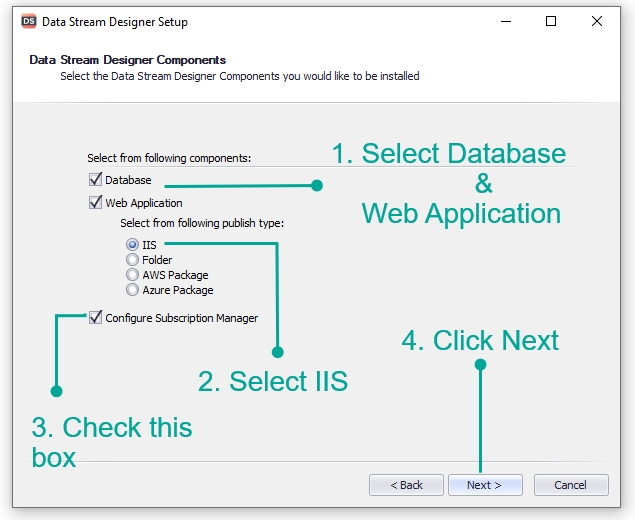
- Select the components that you would like to install
Note
If this is the first time you are installing the Data Stream Designer, it is highly recommended that you select both "Database" and "Web Application".
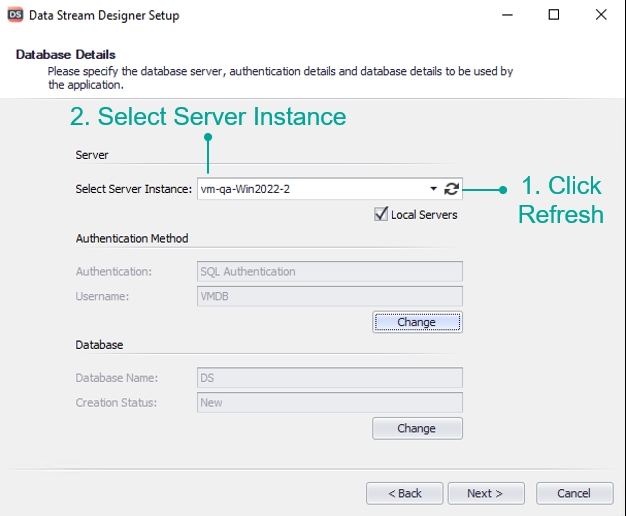
Database
Server
- Select the server instance you would like to connect to.
Note
If you already know the server instance name, it can be entered manually. Otherwise, use the refresh button on the right to load all available servers. Selecting the "Local Servers" check box will limit the search to the local network.
Authentication Method
- Specify the authentication method that should be used: Windows or SQL
9.1. Windows Authentication: you may leave the options as is
Warning
Configure a service account that can be used for Windows authentication.
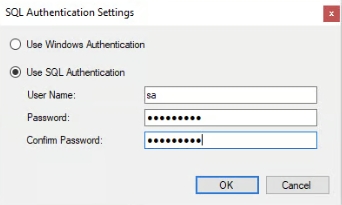
9.2. SQL Authentication:
- To connect to the database using SQL Server authentication, click the "Change" button
- Select the "Use SQL Authentication" option
- Enter the username and password of the SQL Server instance you're connecting to
Warning
The SQL user must have permission to create databases on the server.
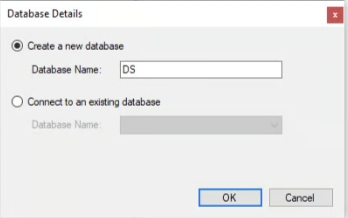
Database
Note
The Database section allows you to configure if you would like to use an existing database or create a new one. Leaving the options as default will result in a new database being created.
To change the pre-populated name of the new database or to select to use an existing database:
- Click the "Change" button and select the appropriate option
- Specify the name of the new database or select an existing database from the drop-down
Encryption Upgrade
If you are upgrading from 4.0 to 4.1+, you will be shown the Encryption Upgrade Settings page. This will assist you in migrating existing Server Variables to the new method of encryption.
Warning
To upgrade existing Server Variables, the details of the Subscription Manager database are required, not the Data Stream Designer database (provided on the previous page).
Upgrade Server Variables?
- Tick to automatically upgrade the Server Variables. It is recommended, but not required. None of the other settings on this page are required if you choose not to upgrade.
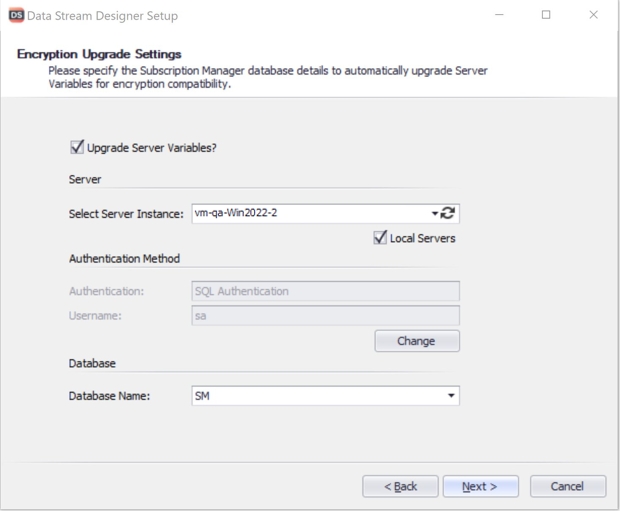
Server
- Select the server instance you want to connect to
Authentication Method
- Specify the authentication method that should be used: Windows or SQL
Database
- Select the Subscription Manager database and click Next
Web Application
DNS Name
- Verify if your DNS name is correct. If not, edit the value to contain the correct DNS name
Note
This is your fully qualified domain name (FQDN). Please find some examples below explaining the DNS name.
- https://localhost/datastreams
- https://vm-qa-win2022-2/datastreams
- https://demo.azurewebsites.com
| Complete Address | DNS | Virtual Directory |
|---|---|---|
| https://localhost/xmprosubscriptionmanager | localhost | datastreams |
| https://vm-qa-win2022-2/xmprosubscriptionmanager | vm-qa-win2022-2 | datastreams |
| https://demo.azurewebsites.com | demo.azurewebsites.com |
Virtual Directory
- Select the parent site from the Web Site drop-down
Note
By default, the Virtual Directory name will be "DataStreams" which will be created within IIS for the Data Stream site. If you wish to change the name you can specify it in the "Virtual Directory Name" text box.
- Verify the value in the content directory field. If incorrect, apply any changes needed
Note
By default, the option to create a sub-directory within the content directory is checked and you can specify a name in the "Sub-Directory" text box.
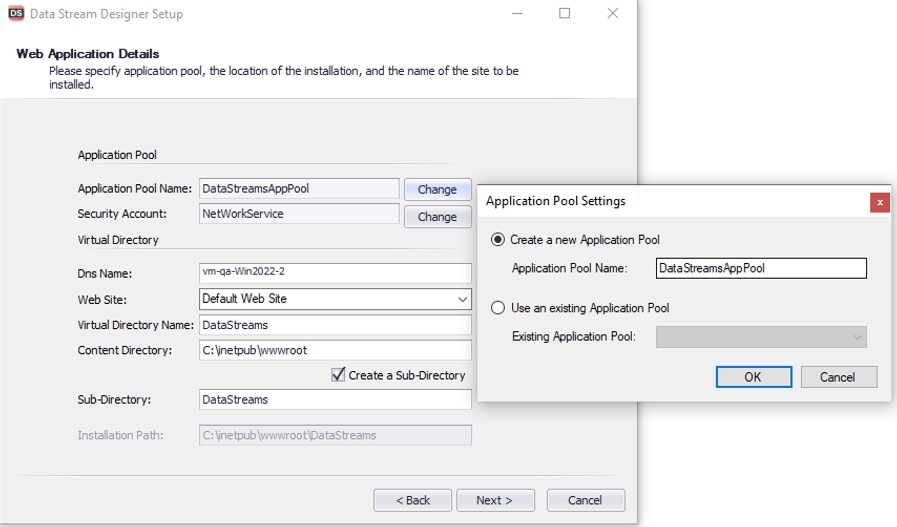
Application Pool
- If you wish to change the name or use an existing application pool, click the Change button
Note
By default, a new application pool will be created when installing the site. The new application pool will have the same name as the name specified in the "Application Pool Name" field.
- Either select the "Create a new Application Pool" or "Use an existing Application Pool" option
Note
If you choose "Create a new Application Pool", give it an appropriate name. If you choose "Use an existing Application Pool", select an existing application pool from the drop-down.
Security Account
- Select "Local System" as the security account.
Note
The two options available to choose from are using a built-in security account or specifying your own security account.
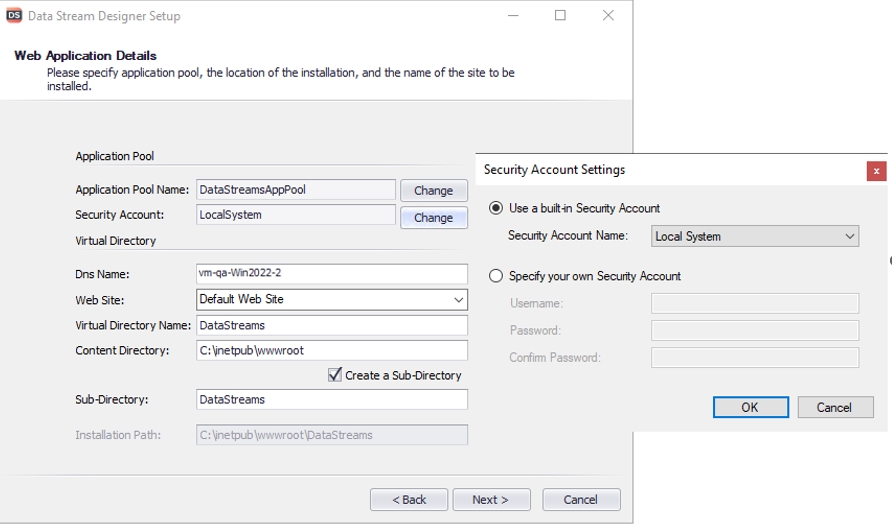
Warning
If you selected Windows authentication to connect to the database, you must choose "Specify your own Security Account" and provide the correct credentials. The service account must have batch logon rights enabled. More Information on how to set up a custom application pool in IIS as well as steps on how to enable batch logon rights can be found in this link.
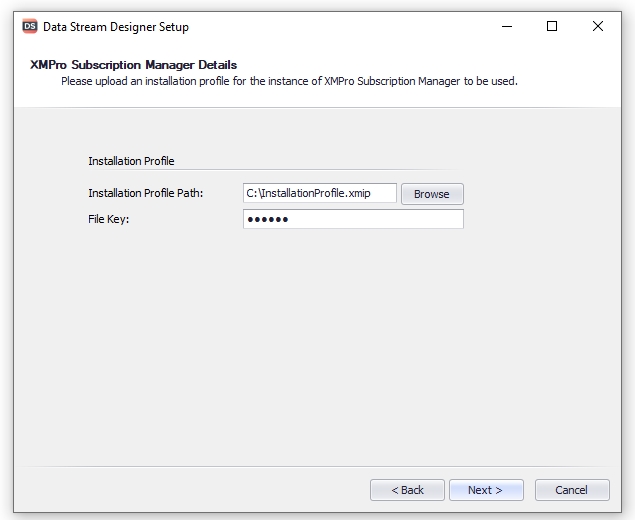
Installation Profile
- Click the Browse button to upload an installation profile for Subscription Manager
- Select a file and click "Next"
Note
This file ensures the Data Stream Designer contains the correct details for the Subscription Manager instance you would like to use. The file can be obtained through the steps outlined previously in this tutorial.
- After you press "Next", authenticate yourself using Subscription Manager credentials
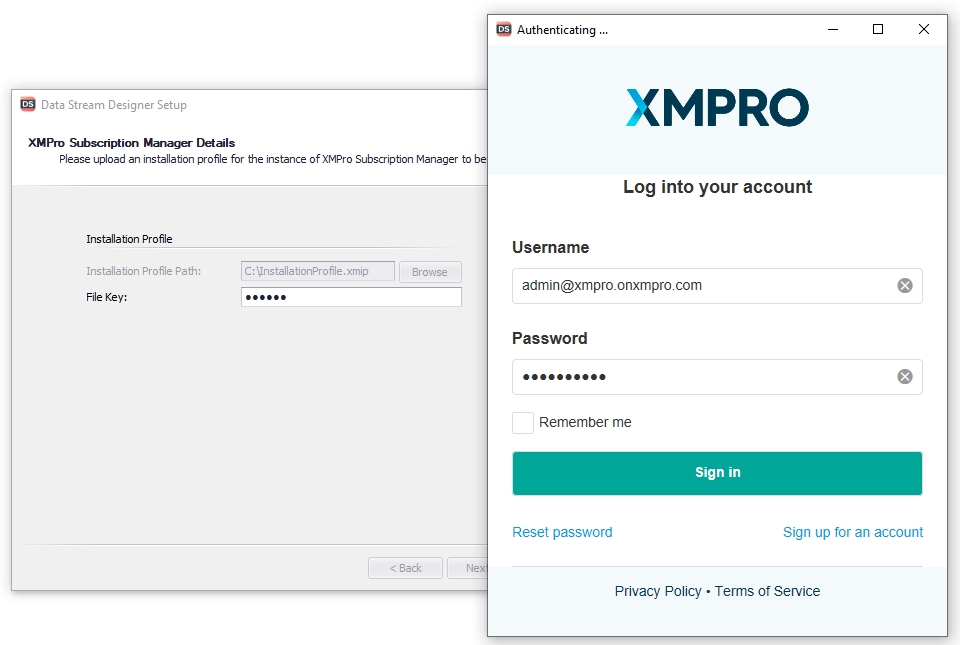
Warning
If you are unable to sign in at this step, please follow this link to disable Internet Explorer Enhanced Security Configuration.
Final Steps
- Continue through the wizard, confirm the installation and the components will be installed
App Designer
- Start the installation process by running the App Designer.exe file that you've received from XMPro.
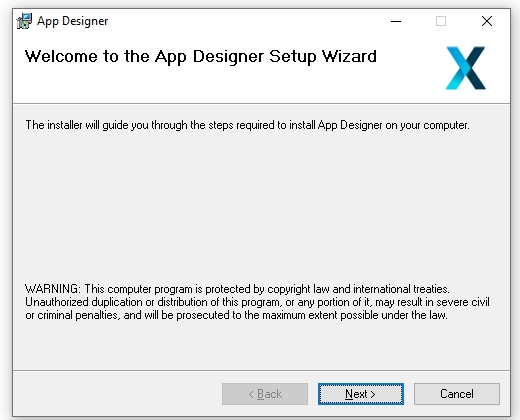
- Click the "I Agree" button and press "Next"

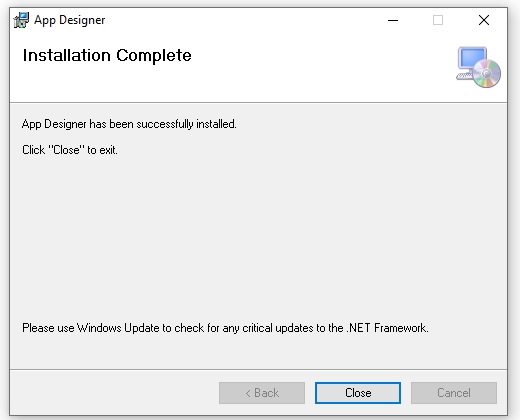
- Follow the instructions and click "Close" when the installation is finished
Note
This "Setup" will install the installer you will use to install the database and website
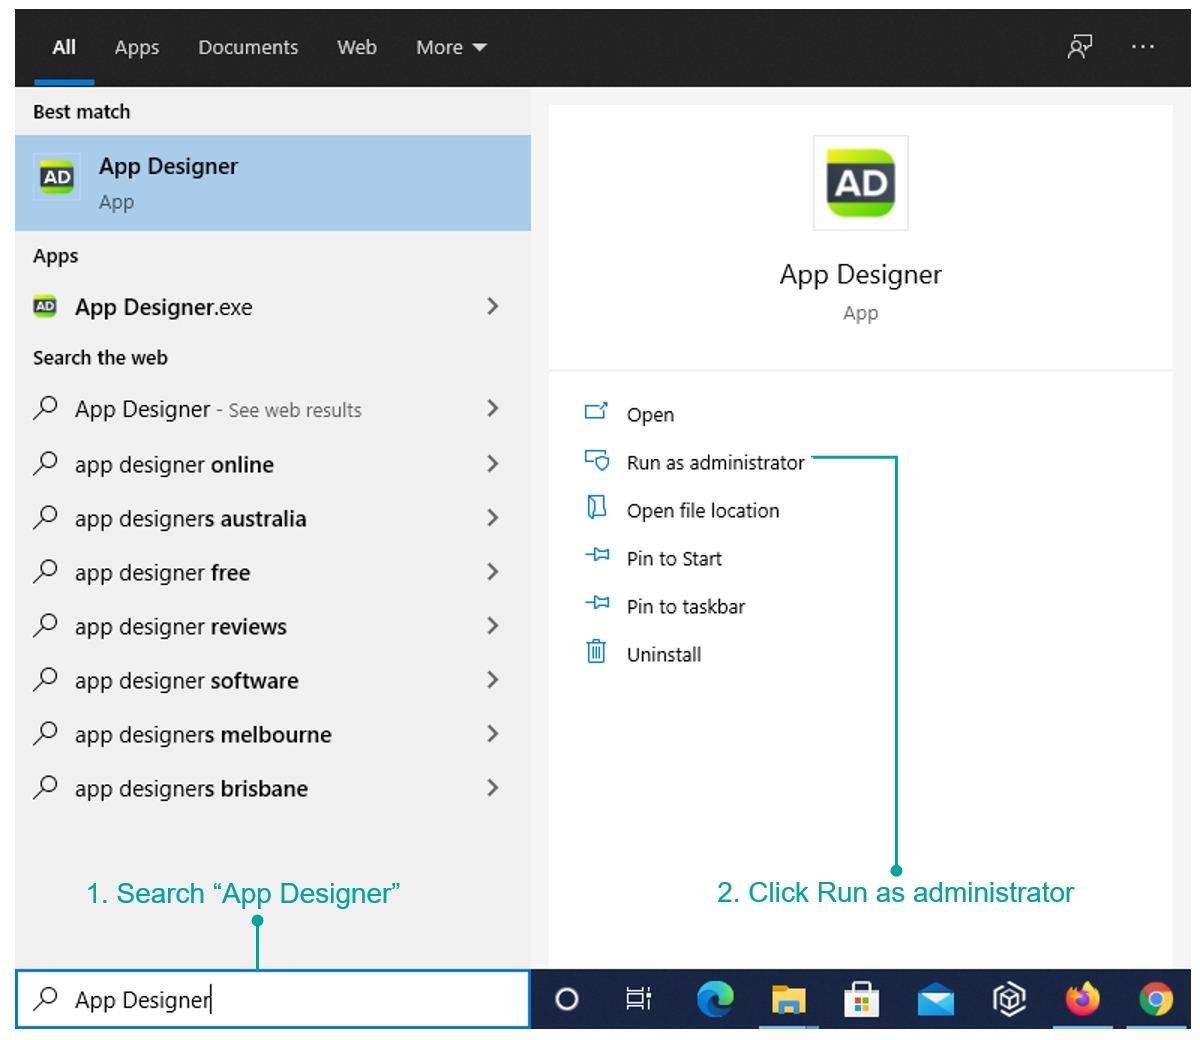
- When this initial installation is complete, open the start menu
- Search for "App Designer" and click on Run as Administrator
Component Choice
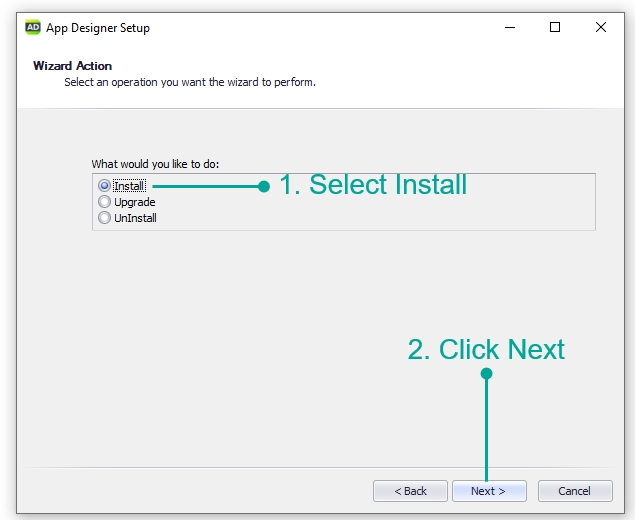
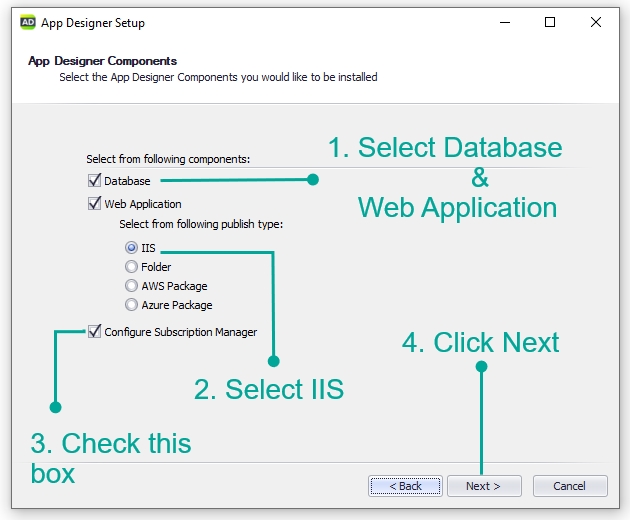
- When the installer launches, choose "Install" and click "Next"
- Select the components that you would like to install and click "Next"
Note
If this is the first time you are installing Subscription Manager, it is highly recommended that you select both "Database" and "Web Application".
Database
Server
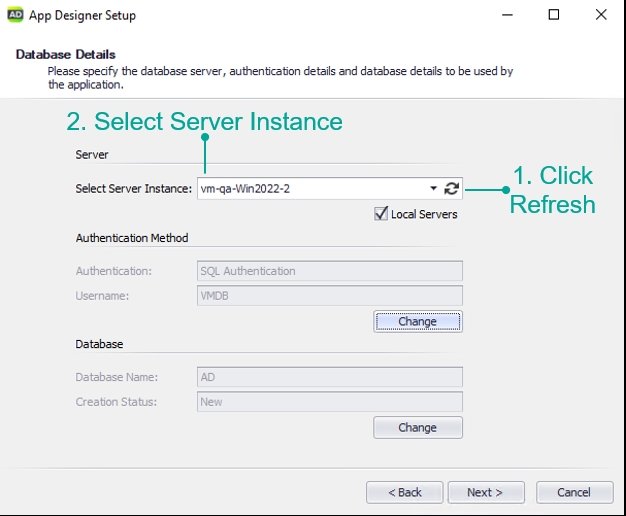
- Select the server instance you would like to connect to
Note
If you already know the server instance name, it can be entered manually. Otherwise, use the refresh button on the right to load all available servers. Selecting the "Local Servers" check box will limit the search to the local network.
Authentication Method
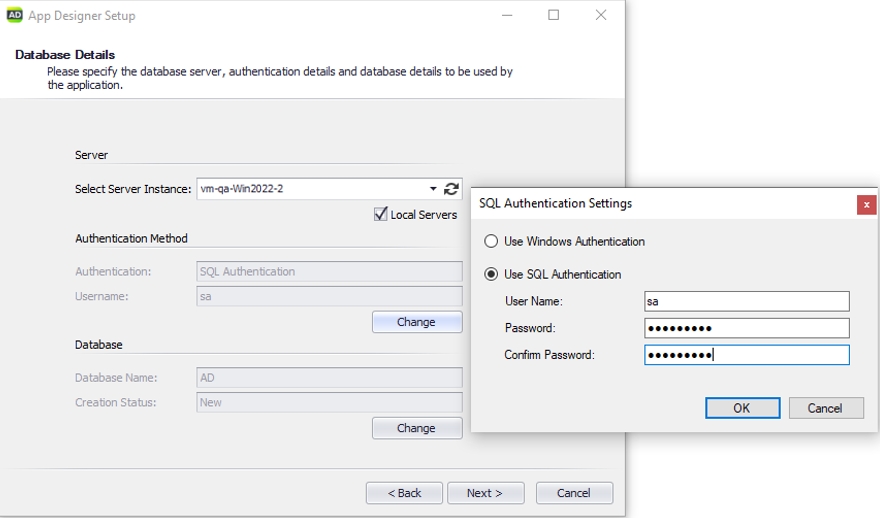
- Specify the authentication method that should be used: Windows or SQL
9.1. Windows Authentication: you may leave the options as is
Warning
Configure a service account that can be used for Windows authentication
9.2. SQL Authentication:
- Click the "Change" button
- Select the "Use SQL Authentication" option
- Enter the username and password of the SQL Server instance you're connecting to
Warning
The SQL user must have permission to create databases on the server.
Database
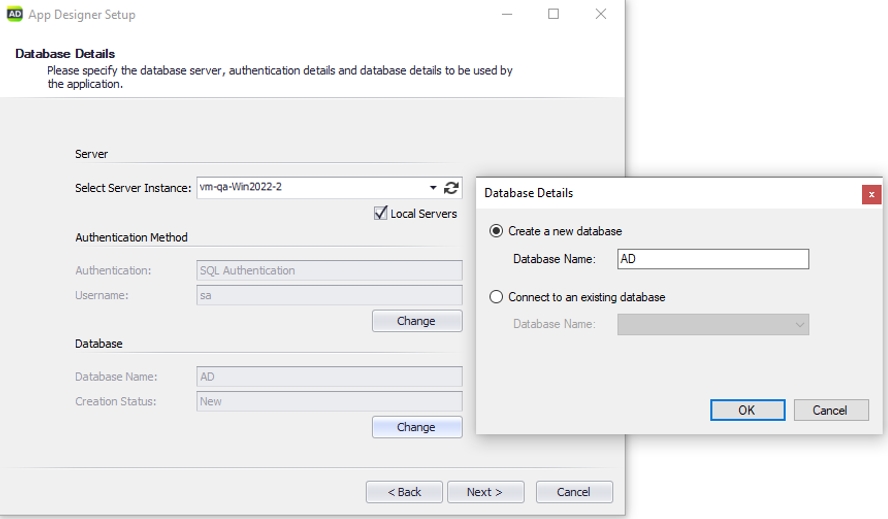
Note
The Database section allows you to configure if you would like to use an existing database or create a new one. Leaving the options as default will result in a new database being created.
To change the pre-populated name of the new database or to select to use an existing database:
- Click the "Change" button and select the appropriate option
- Specify the name of the new database or select an existing database from the drop-down
Encryption Upgrade
If you are upgrading from 4.0 to 4.1 or greater, you will be shown the Encryption Upgrade Settings page. This will assist you in migrating existing Server Variables and Connector settings to the new method of encryption.
Warning
To upgrade existing Server Variables, the details of the Subscription Manager database is required, not the Data Stream Designer database (provided on the previous page).
App Designer Encryption Key
- Enter the App Designer Encryption Key
Note
To find the App Designer Encryption Key, inspect the appsettings.json file in the web server files. It will be found under the JSON path "xmpro.appDesigner.encryptionKey".
If that path does not exist, it is stored in a cloud-service key vault. Search for the "xmpro.keyVault" JSON object for the details required to find the encryption key.
Documentation for the Azure and Amazon key vaults have been linked for convenience.
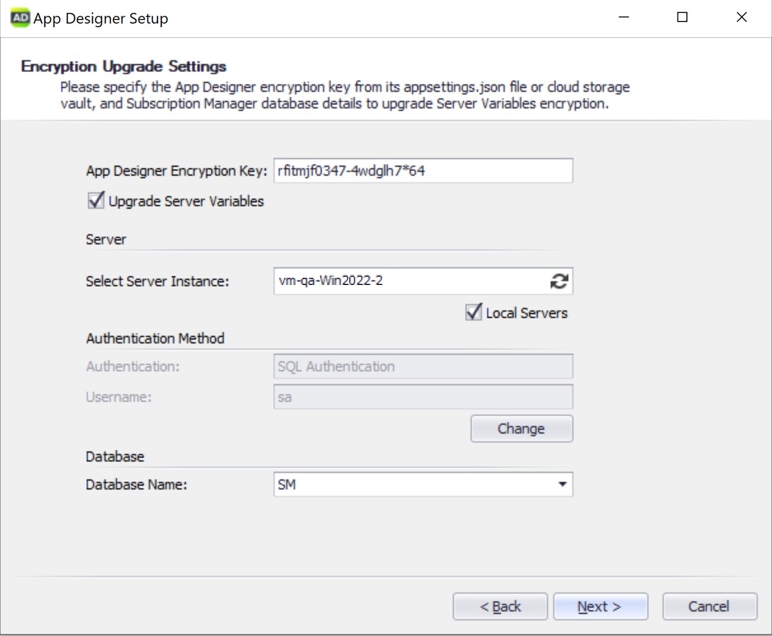
Upgrade Server Variables?
- Tick to automatically upgrade the Server Variables. It is recommended, but not required. None of the other settings on this page are required if you choose not to upgrade.
Server
- Select the server instance you want to connect to
Authentication Method
- Specify the authentication method that should be used: Windows or SQL
Database
- Select the Subscription Manager database and click Next
Web Application
DNS Name
- Verify if your DNS name is correct, if not, edit the value to contain the correct DNS name
Note
This is your fully qualified domain name (FQDN). Please find some examples below explaining the DNS name.
- https://localhost/xmprosubscriptionmanager
- https://vm-qa-win2022-2/xmprosubscriptionmanager
- https://demo.azurewebsites.com
| Complete Address | DNS | Virtual Directory |
|---|---|---|
| https://localhost/xmprosubscriptionmanager | localhost | xmprosubscriptionmanager |
| https://vm-qa-win2022-2/xmprosubscriptionmanager | vm-qa-win2022-2 | xmprosubscriptionmanager |
| https://demo.azurewebsites.com | demo.azurewebsites.com |
Virtual Directory
- Select the parent site from the Web Site drop-down
Note
By default, the Virtual Directory name will be "AppDesigner" which will be created within IIS for the Data Stream site. If you wish to change the name you can specify it in the "Virtual Directory Name" text box.
- Verify if the value in the content directory field is correct. If not, apply any changes needed
Note
By default, the option to create a sub-directory within the content directory is checked and you can specify a name in the "Sub-Directory" text box.
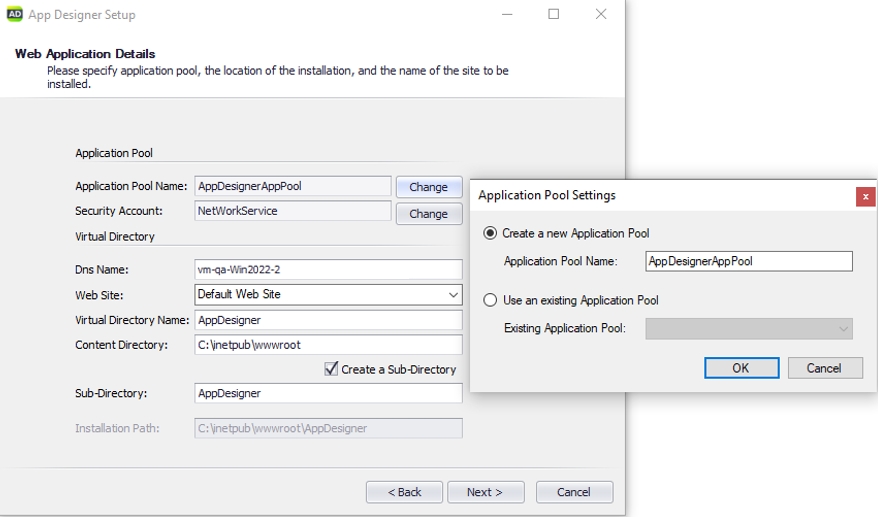
Application Pool
- If you wish to change this name or use an existing application pool, click the Change button
Note
By default, a new application pool will be created when installing the site. The new application pool will have the same name as the name specified in the "Application Pool Name" field.
- Either select the "Create a new Application Pool" or "Use an existing Application Pool" option
Note
If you choose "Create a new Application Pool", give it an appropriate name. If you choose "Use an existing Application Pool", select an existing application pool from the drop-down.
Security Account
- Select "Local System" as the security account
Note
You can either change it by selecting a different built-in security account from the drop-down or by specifying your own security account.
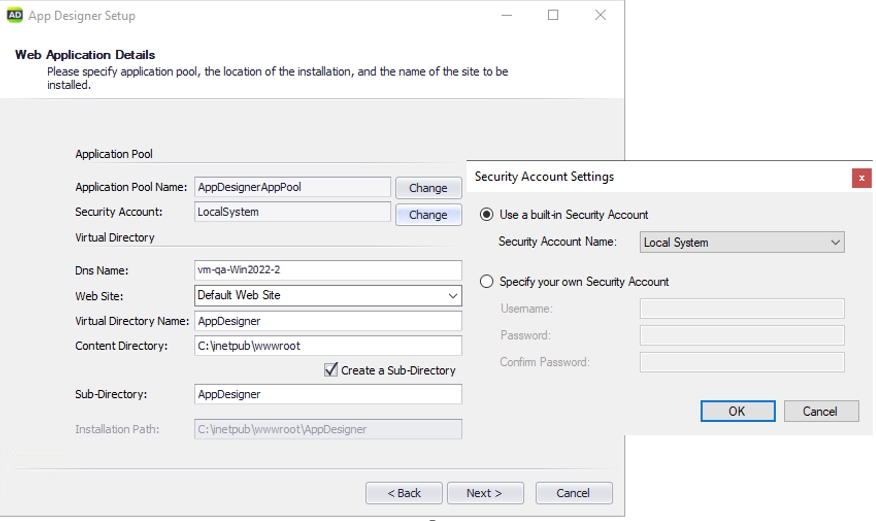
Warning
If you selected Windows authentication to connect to the database, you must choose "Specify your own Security Account" and provide the correct credentials. The service account must have batch logon rights enabled. More Information on how to set up a custom application pool in IIS as well as steps on how to enable batch logon rights can be found in this link.
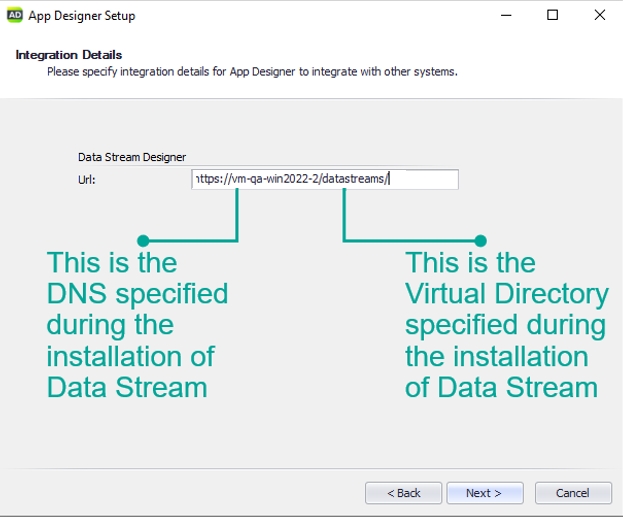
Integration Details
- Type in the URL of Data Stream designer in the text box
SMTP
- Enter the SMTP settings referenced in the 1. Preparation guide. By default, the "Enable Email Notification" is checked.
Note
SMTP can be disabled by unchecking the "Enable Email Notification" checkbox if you don't want to receive email notifications. If at a later stage email notifications are needed, the installer can be run again to add SMTP functionality.
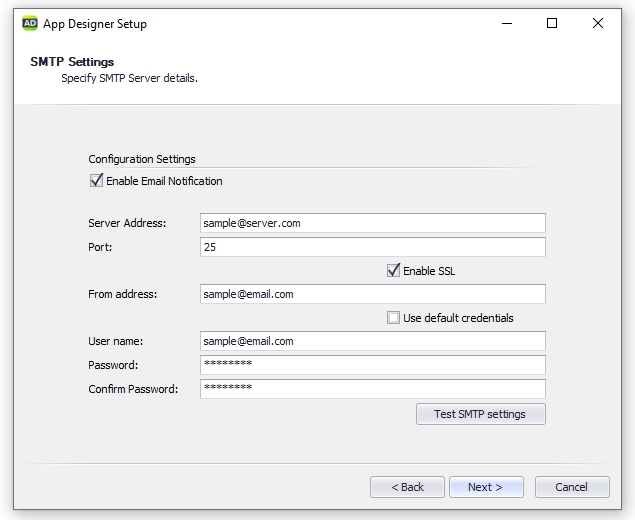
Warning
You are required to set up an SMTP account. Failing to do so will make registering new users very cumbersome.
It is highly recommended to check your connection to the email server using the "Test SMTP settings" button.
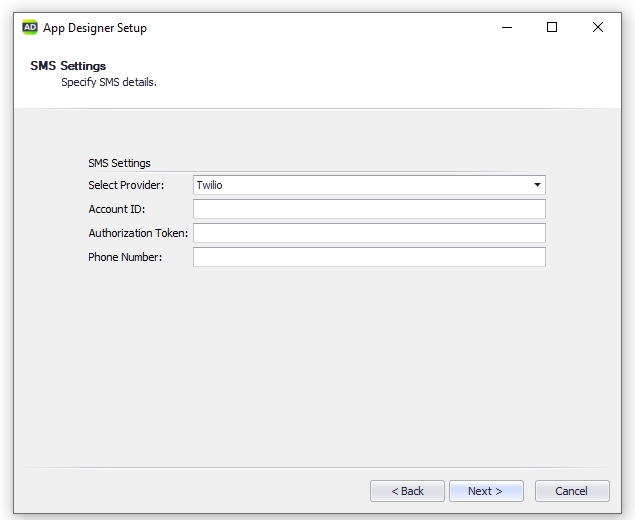
Twilio (Optional)
- Enter the Twilio details referenced in the 1. Preparation guide. If you don't want SMS notifications you can select "None" from the "Select Provider" dropdown.
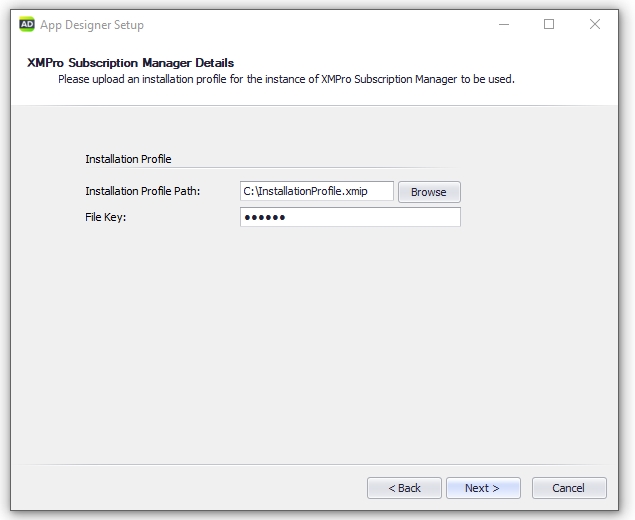
Installation Profile
- Click the Browse button to upload an installation profile for Subscription Manager
- Select a file and click "Next"
Note
This file ensures the App Designer contains the correct details for the Subscription Manager instance you would like to use. The file used can be obtained through the steps outlined previously in this tutorial.
The Installation Profile generated for Data Stream Installer can be used in this step.
- After you press "Next", authenticate yourself using Subscription Manager credentials
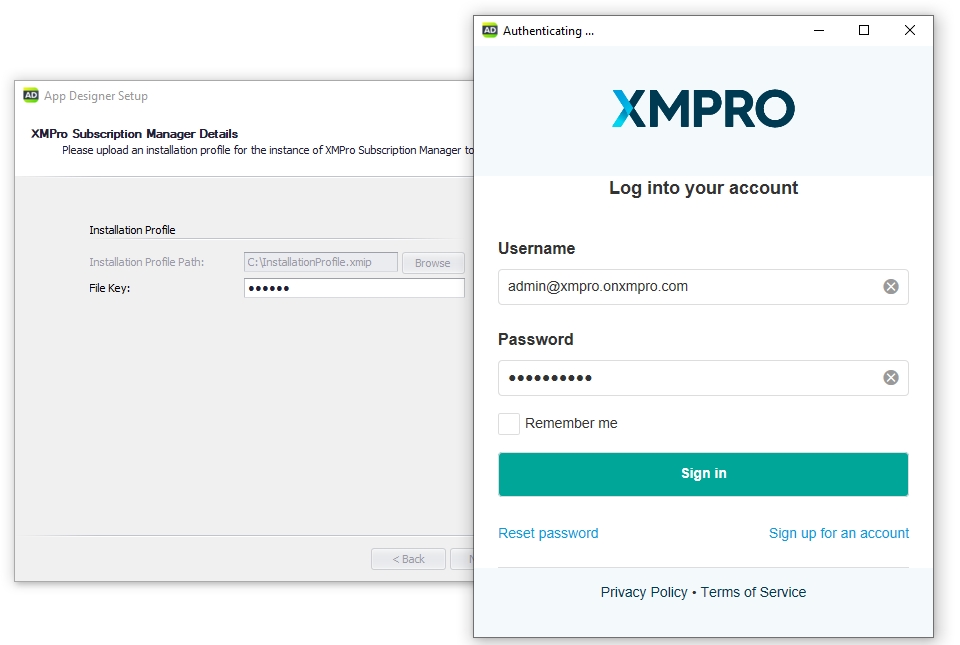
Warning
If you are unable to sign in at this step, please follow this link to disable Internet Explorer Enhanced Security Configuration.
Final Steps
- Continue through the wizard, confirm the installation and the components will be installed
Next Step: Complete Installation
The installation of the XMPro Platform is now complete, but there are some environment setup steps before you can use the platform. Please click the below link for further instructions:
Last modified: June 04, 2025